Are you tired of being charged for subscriptions you no longer use on your iPhone? Don’t worry, we’ve got you covered!
In this article, we will guide you through the step-by-step process of removing subscriptions on your iPhone. Managing your subscriptions is essential to avoid unnecessary expenses and keep your device clutter-free.
We will also highlight common mistakes to avoid and explore different methods to cancel subscriptions hassle-free.
Get ready to regain control of your iPhone subscriptions!
Step-By-Step Guide to Removing Subscriptions on Iphone
To remove subscriptions on your iPhone, follow these step-by-step instructions.
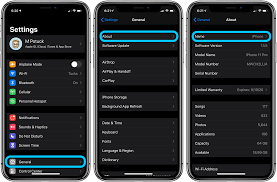
- Open the Settings app on your home screen.
- Tap on your Apple ID at the top of the screen.
- Select ‘Subscriptions’ from the menu that appears.
- Here, you’ll see a list of all the subscriptions you currently have.
- Tap on the subscription you want to cancel.
- Choose the ‘Cancel Subscription’ option.
- A confirmation message will appear, asking if you want to cancel the subscription.
- Simply tap ‘Confirm’ to complete the process.
Once canceled, the subscription will no longer renew, and you won’t be charged for it anymore.
Remember to check your subscriptions periodically to ensure you’re not being billed for any services you no longer use.
Understanding the Importance of Managing Subscriptions on Iphone
Make sure you understand why managing subscriptions is important on your iPhone. By actively managing your subscriptions, you can avoid unnecessary charges and keep your expenses in check.
With the increasing popularity of subscription-based services, it’s easy to accumulate multiple subscriptions without even realizing it. These subscriptions can range from music streaming apps to fitness programs or even news subscriptions. Without proper management, you may end up paying for services you no longer use or need.
By regularly reviewing and canceling unwanted subscriptions, you can save money and allocate your funds towards more important things. Additionally, managing subscriptions ensures that you have control over your personal information and reduces the risk of unauthorized charges.
Common Mistakes to Avoid When Trying to Remove Subscriptions on Iphone
When trying to cancel subscriptions on your iPhone, be careful to avoid these common mistakes.
First, make sure you are signed in with the correct Apple ID. It’s easy to accidentally sign in with a different Apple ID, which can make it impossible to cancel subscriptions associated with the correct account.
Secondly, don’t forget to check for active subscriptions in the App Store or iTunes. Some subscriptions may not be visible in your iPhone settings, so it’s important to double-check in these other places.
Additionally, be cautious of falling for misleading ‘Cancel Subscription’ buttons or links in emails. Always go directly to the app or service’s website or use the official Apple settings to cancel your subscriptions.
Lastly, be mindful of any cancellation fees or terms that may apply. Read the fine print and understand the consequences before canceling a subscription.
Exploring Different Methods to Cancel Subscriptions on Iphone
Exploring different methods for canceling subscriptions on your iPhone can help you effectively manage your app and service subscriptions.
There are several ways you can go about canceling subscriptions on your iPhone. One method is to go directly to the Settings app on your device. Simply open the Settings app, tap on your Apple ID at the top of the screen, then tap on ‘Subscriptions.’ From there, you can view and manage all your active subscriptions and cancel any that you no longer want.
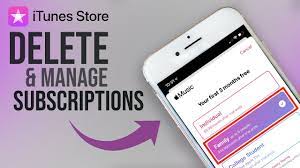
Another method is to use the App Store. Open the App Store app, tap on your profile picture, then tap on ‘Subscriptions.’ Here, you can easily manage and cancel your subscriptions.
Additionally, some apps also provide the option to cancel subscriptions within the app itself.
Tips and Tricks for a Hassle-Free Process of Removing Subscriptions on Iphone
To ensure a hassle-free process, you can easily manage and cancel your unwanted app and service subscriptions on your iPhone by following these helpful tips and tricks.
First, open the App Store on your iPhone and tap on your profile picture in the top right corner. Then, scroll down and tap on ‘Subscriptions’ to see a list of all your active subscriptions.
From here, you can choose the subscription you want to cancel and tap on ‘Cancel Subscription.’ You can also turn off automatic renewal for a subscription by tapping on ‘Automatic Renewal’ and selecting ‘Off.’
Additionally, you can manage your subscriptions through the Settings app by going to ‘iTunes & App Store’ and tapping on your Apple ID.
Finally, make sure to keep track of your subscription renewal dates and cancel any unwanted subscriptions before they renew.
With these tips and tricks, you can easily remove subscriptions and save money on your iPhone.
Conclusion
In conclusion, managing subscriptions on your iPhone is crucial for maintaining control over your finances and digital content.
By following the step-by-step guide and avoiding common mistakes, you can easily remove unwanted subscriptions.
Whether you choose to cancel through the App Store, in-app settings, or using third-party apps, there are various methods available to cater to your preferences.
With these tips and tricks, you can ensure a hassle-free process of removing subscriptions on your iPhone.
Take charge of your subscriptions and enjoy a clutter-free experience.